Are you experiencing issues with your mobile data connection? Resetting your APN (Access Point Name) settings can often resolve connectivity problems and ensure a smooth internet experience on your iPhone or Android device. Follow this step-by-step guide to reset your APN settings and get back online.
1. Swipe Down:
Start by swiping down from the top of your screen to access the notification panel.
2. Scroll to the Right:
Swipe or scroll to the right to view additional quick settings options.

3. Tap Settings:
Locate the “Settings” option among the quick settings icons and tap on it to open the Settings menu.

4. Tap Network & Internet:
In the Settings menu, find and tap on the “Network & Internet” option. This may also be labeled as “Connections” or “Wireless & Networks” depending on your device.

5. Tap Mobile Network:
Within the Network & Internet settings, look for “Mobile Network” or “Cellular Network” and tap on it.
6. Tap the Name of Your Cell Phone Company:
Find and select the name of your cell phone company or carrier from the available options. This will vary based on your service provider.

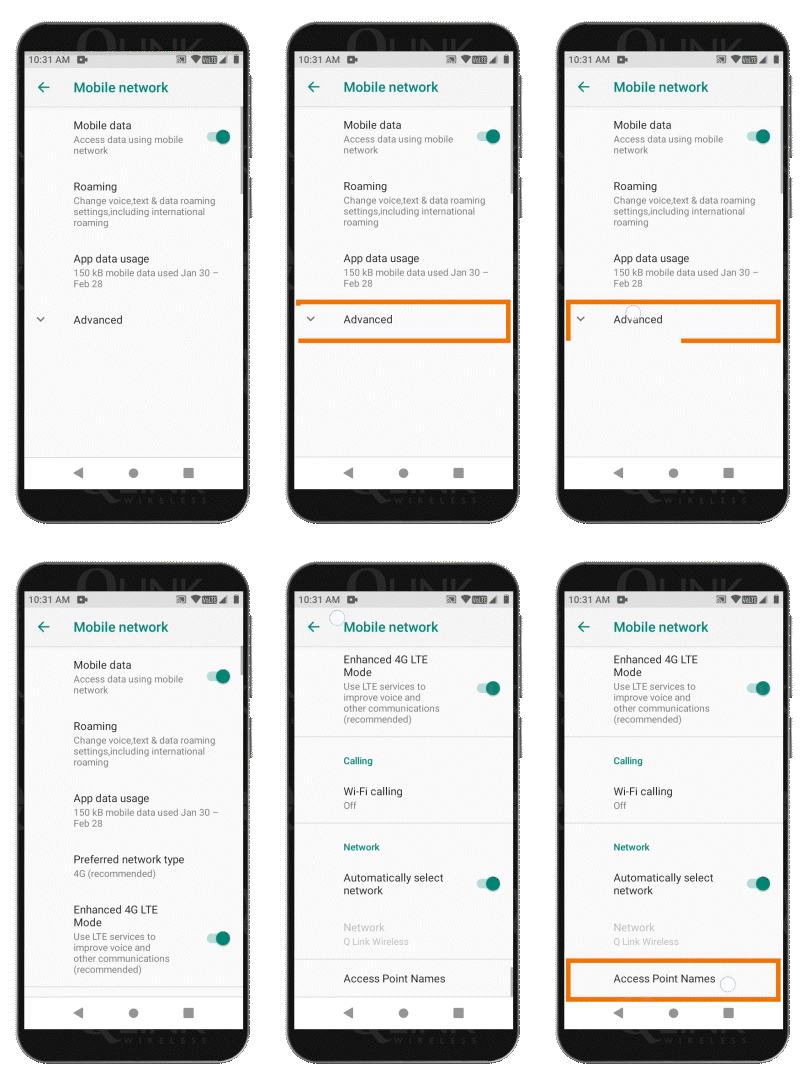
7. Tap Advanced:
Look for an option labeled “Advanced” and tap on it. This may be found in a separate menu or under additional settings.
8. Tap Access Point Names:
Under the Advanced settings, locate and tap on “Access Point Names” (APN). This is where you can configure and edit your APN settings.
9. Tap the Menu at the Top Right of Your Screen:
Look for a menu icon, usually represented by three dots or lines, at the top right corner of your screen. Tap on it to access additional options.
10. Tap New APN:
From the menu options, select “New APN” to create a new APN profile.

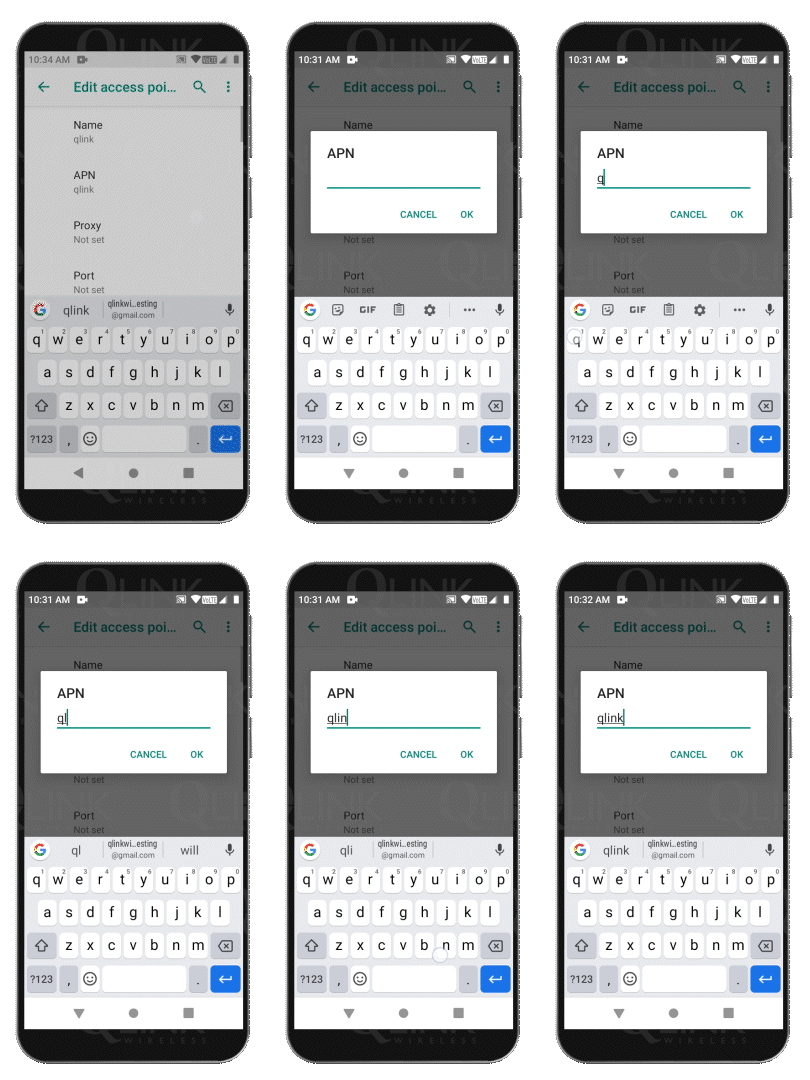
11. Under Name, enter "qlink":
In the New APN settings, enter “qlink” as the name for the APN configuration. This is just a label to identify the APN.
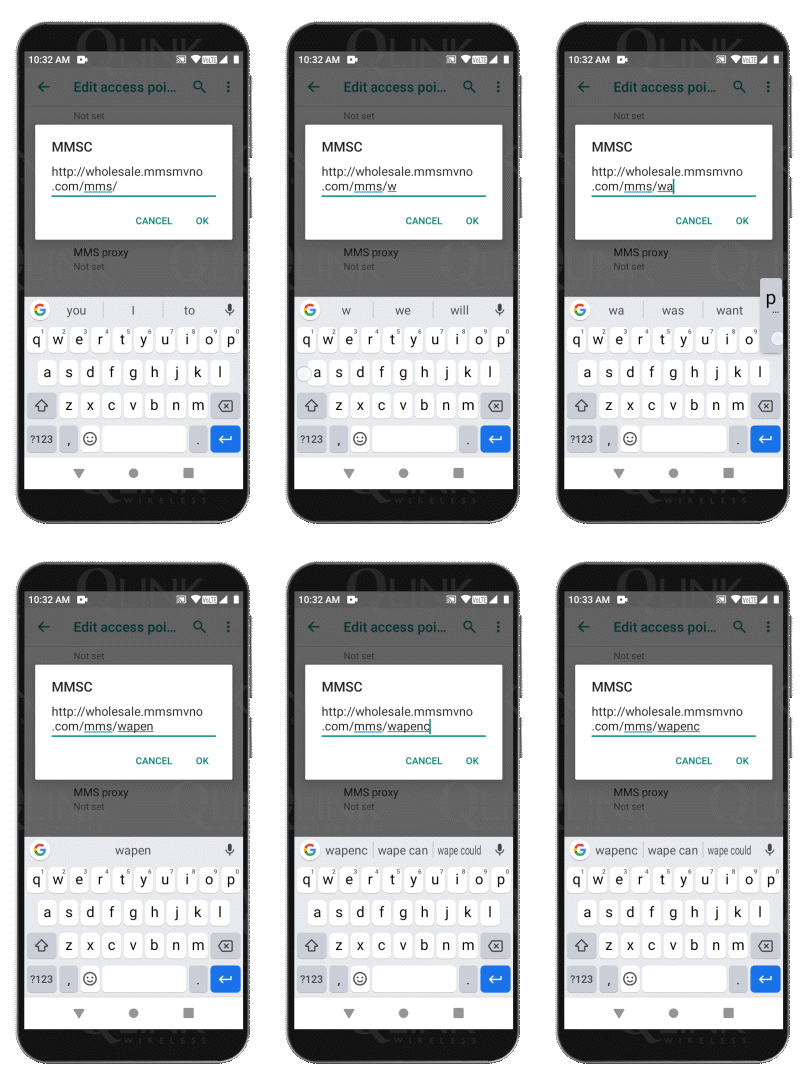
12. Under MMSC, enter
"http://wholesale.mms
mvno.com/m/wapenc":
Enter the MMSC (Multimedia Messaging Service Center) URL provided by your carrier. In this case, it should be “http://wholesale.mmsmvno.com/mms/wapenc“.
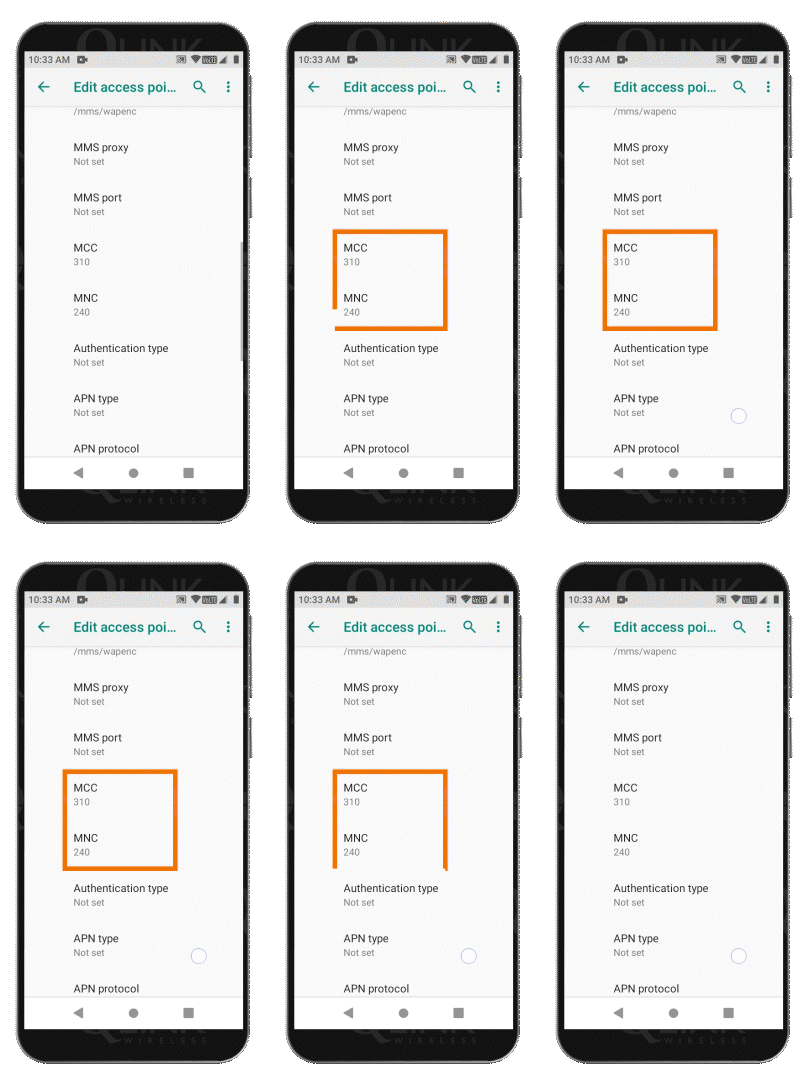
13. Your MMC should say:
The MMC (Mobile Country Code) should be set to “318” to identify the United States as the country code.
14. Your MNC should say:
The MNC (Mobile Network Code) should be set to “240” to correspond to your specific carrier.
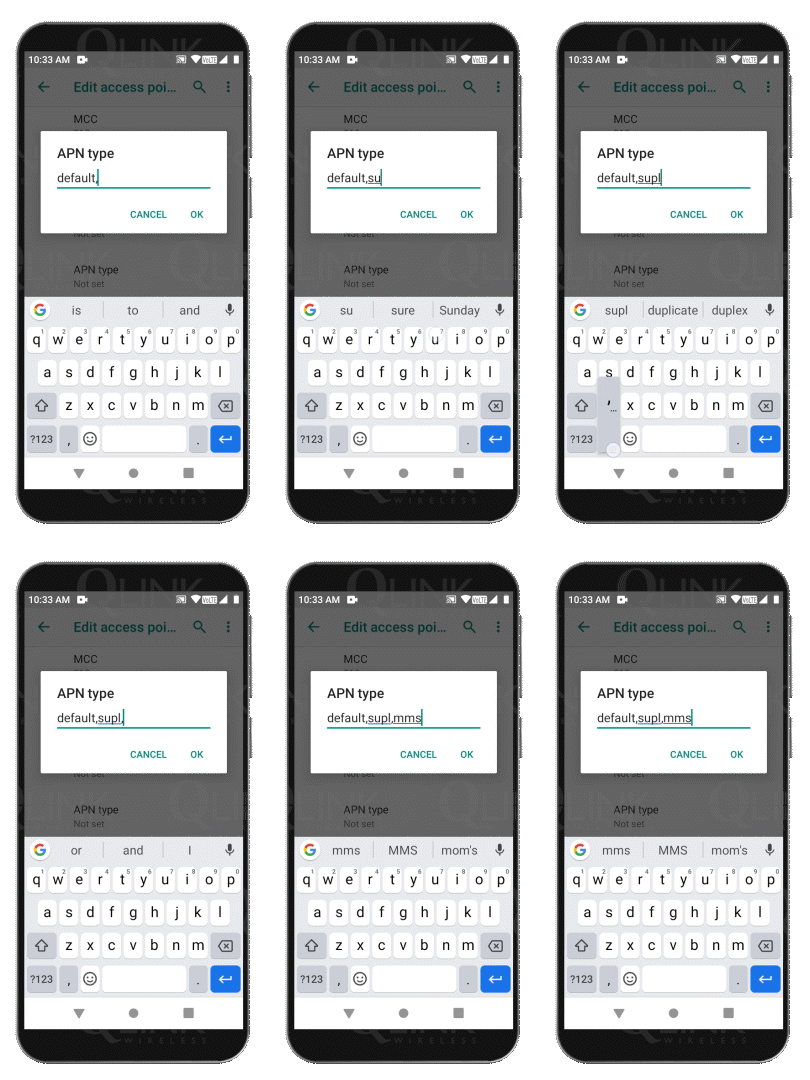
15. Under APN Type, enter "default.supl.mms":
Specify the APN type as “default.supl.mms” to enable data, MMS (Multimedia Messaging Service), and supplemental location information.
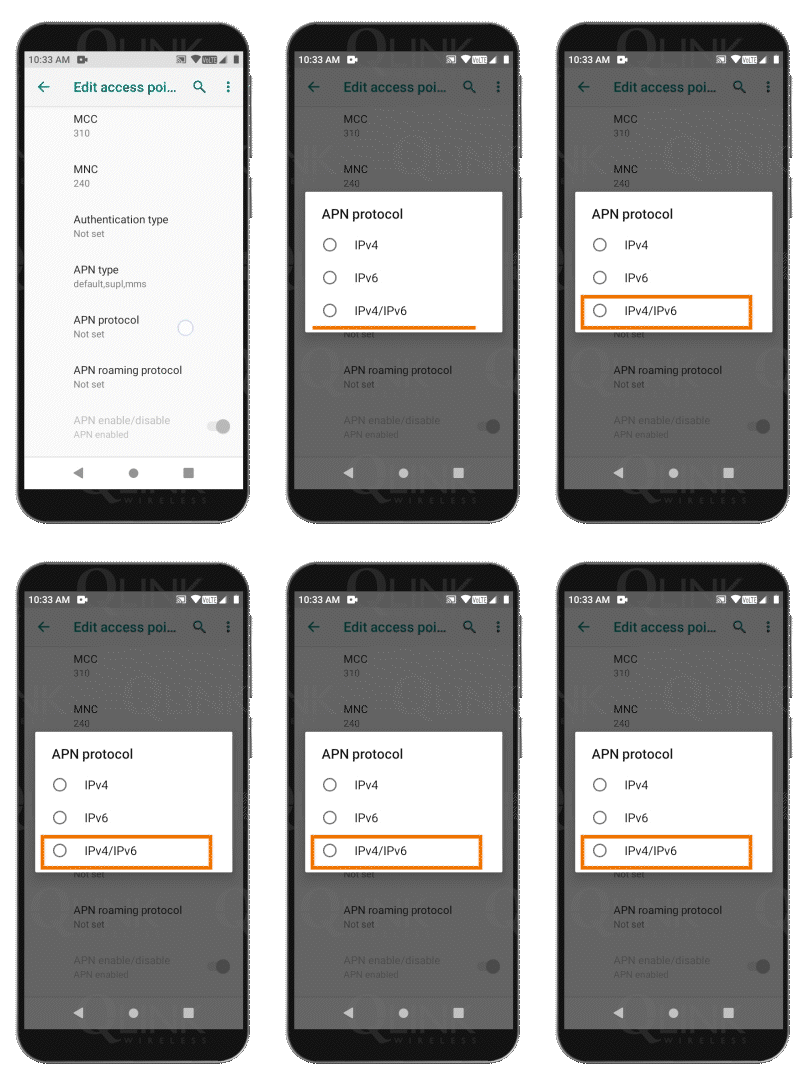
16. Under APN Protocol, choose "IPv4/IPv6":
Select the appropriate APN protocol option from the available choices. In this case, choose “IPv4/IPv6” to support both IP versions.
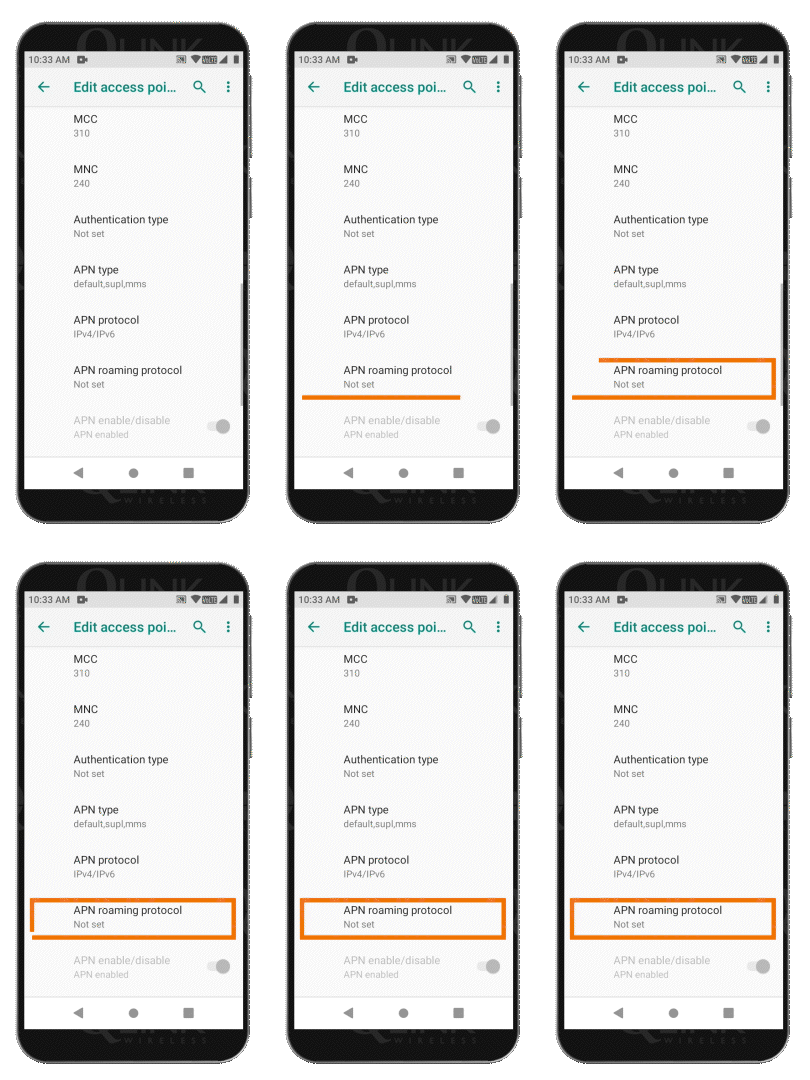
17. Tap APN Roaming Protocol:
Select the appropriate APN protocol option from the available choices. In this case, choose “IPv4/IPv6” to support both IP versions.
18. Tap the Menu at the Top Right of Your Screen:
Tap the menu icon at the top right corner of your screen.

19. Tap Save:
After configuring the APN settings, locate the “Save” or “OK” button, usually located at the top or bottom of the screen. Tap on it to save your changes.

20. From APNs, choose "qlink":
Once you’ve saved the new APN configuration, you’ll be directed back to the Access Point Names screen. From the list of available APNs, select the newly created “qlink” APN to activate it as your default APN.

21. Restart your phone:
To ensure that the new APN settings take effect, it’s recommended to restart your phone. This will refresh the network connections and apply the changes.

22. Turn on your Wi-Fi:
After your phone has restarted, access the Wi-Fi settings and turn on your Wi-Fi connection. This step is optional but allows you to verify your internet connectivity through a Wi-Fi network.
23. Visit any website:
Open your preferred web browser and visit any website of your choice. If you’re able to surf the web and access online content without any issues, it indicates that you have successfully updated your APN settings and restored your data connectivity.

Struggling with APN Settings? Find Solutions in Our Comprehensive Guide.
For detailed information on updating your Access Point Name (APN) Settings, refer to our comprehensive guide. It provides step-by-step instructions and additional resources to assist you. Now, let’s address your question: How can I update my APN settings?
Was this helpful?
Remember, the specific steps and menu options may vary slightly depending on the make and model of your device and the version of the operating system. If you encounter any difficulties or are unable to find certain settings, it’s recommended to consult your device’s user manual or reach out to out customer support for further assistance.
